4.2.10 Creating the colored mesh
If you think that these things we have been examining are advanced, then
you haven't seen anything. Now comes real hard-core advanced POV-Ray code,
so be prepared. This could be called The really advanced section.
We have now calculated the image into the array of colors. However, we
still have to show these color "pixels" on screen, that is, we have to make
POV-Ray to render our pixels so that it creates a real image.
There are several ways of doing this, all of them being more or less
"kludges" (as there is currently no way of directly creating an image map
from a group of colors). One could create colored boxes representing each
pixel, or one could output to an ascii-formatted image file (mainly PPM)
and then read it as an image map. The first one has the disavantage of
requiring huge amounts of memory and missing bilinear interpolation of the
image; the second one has the disadvantage of requiring a temporary file.
What we are going to do is to calculate a colored mesh2 which represents
the "screen".
As colors are interpolated between the vertices of a triangle, the
bilinear interpolation comes for free (almost).
4.2.10.1 The structure of the mesh
Although all the triangles are located in the x-y plane and they are all
the same size, the structure of the mesh is quite complicated (so complicated
it deserves its own section here).
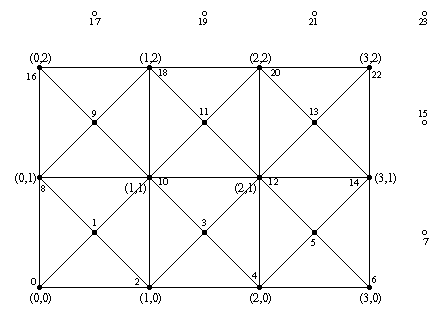
The following image shows how the triangles are arranged for a 4x3 pixels
image:

Triangle arrangement for a 4x3 image
The number pairs in parentheses represent image pixel coordinates
(eg. (0,0) refers to the pixel at the lower left corner of
the image and (3,2) to the pixel at the upper right corner).
That is, the triangles will be colored as the image pixels at these
points. The colors will then be interpolated between them along the surface
of the triangles.
The filled and non-filled circles in the image represent the vertex points
of the triangles and the lines connecting them show how the triangles are
arranged. The smaller numbers near these circles indicate their index value
(the one which will be created inside the mesh2).
We notice two things which may seem odd: Firstly there are extra vertex
points outside the mesh, and secondly, there are extra vertex points in the
middle of each square.
Let's start with the vertices in the middle of the squares: We could
have just made each square with two triangles instead of four, as we have
done here. However, the color interpolation is not nice this way, as there
appears a clear diagonal line where the triangle edges go. If we make
each square with four triangles instead, then the diagonal lines are
less apparent, and the interpolation resembles a lot better a true
bilinear interpolation. And what is the color of the middle points? Of
course it's the average of the color of the four points in the corners.
Secondly: Yes, the extra vertex points outside the mesh are completely
obsolete and take no part in the creation of the mesh. We could perfectly
create the exact same mesh without them. However, getting rid of these
extra vertex points makes our lives more difficult when creating the
triangles, as it would make the indexing of the points more difficult.
It may not be too much work to get rid of them, but they don't take
any considerable amount of resources and they make our lives easier, so
let's just let them be (if you want to remove them, go ahead).
4.2.10.2 Creating the mesh
What this means is that for each pixel we create two vertex points,
one at the pixel location and one shifted by "0.5" in the x and y directions.
Then we specify the color for each vertex points: For the even vertex points
it's directly the color of the correspondent pixel; for the odd vertex points
it's the average of the four surrounding pixels.
Let's examine the creation of the mesh step by step:
4.2.10.2.1 Creating the vertex points
#default { finish { ambient 1 } }

#debug "Creating colored mesh to show image...\n"
mesh2
{ vertex_vectors
  { ImageWidth*ImageHeight*2,
    #declare IndY = 0;
    #while(IndY < ImageHeight)
      #declare IndX = 0;
      #while(IndX < ImageWidth)
        <(IndX/(ImageWidth-1)-.5)*ImageWidth/ImageHeight*2,
         IndY/(ImageHeight-1)*2-1, 0>,
        <((IndX+.5)/(ImageWidth-1)-.5)*ImageWidth/ImageHeight*2,
         (IndY+.5)/(ImageHeight-1)*2-1, 0>
        #declare IndX = IndX+1;
      #end
      #declare IndY = IndY+1;
    #end
  }
First of all we use a nice trick in POV-Ray: Since we are not using
light sources and there's nothing illuminating our mesh, what we do
is to set the ambient value of the mesh to 1. We do this by just making
it the default with the #default command, so we don't have
to bother later.
As we saw above, what we are going to do is to create two vertex points
for each pixel. Thus we know without further thinking how many vertex
vectors there will be: ImageWidth*ImageHeight*2
That was the easy part; now we have to figure out how to create the
vertex points themselves. Each vertex location should correspond to the
pixel location it's representing, thus we go through each pixel index
(practically the number pairs in parentheses in the image above) and
create vertex points using these index values. The location of these
pixels and vertices are the same as we assumed when we calculated the
image itself (in the previous part). Thus the y coordinate of each vertex
point should go from -1 to 1 and similarly the x coordinate, but scaled
with the aspect ratio.
If you look at the creation of the first vector in the code above, you'll
see that it's almost identical to the direction vector we calculated when
creating the image.
The second vector should be shifted by 0.5 in both directions, and that's
exactly what is done there. The second vector definition is identical to
the first one except that the index values are shifted by 0.5. This creates
the points in the middle of the squares.
The index values of these points will be arranged as shown in the image
above.
4.2.10.2.2 Creating the textures
  texture_list
  { ImageWidth*ImageHeight*2,
    #declare IndY = 0;
    #while(IndY < ImageHeight)
      #declare IndX = 0;
      #while(IndX < ImageWidth)
        texture { pigment { rgb Image[IndX][IndY] } }
        #if(IndX < ImageWidth-1 & IndY < ImageHeight-1)
          texture { pigment { rgb
            (Image[IndX][IndY]+Image[IndX+1][IndY]+
             Image[IndX][IndY+1]+Image[IndX+1][IndY+1])/4 } }
        #else
          texture { pigment { rgb 0 } }
        #end
        #declare IndX = IndX+1;
      #end
      #declare IndY = IndY+1;
    #end
  }
Creating the textures is very similar to creating the vertex points
(we could have done both inside the same loop, but due to the syntax
of the mesh2 we have to do it separately).
So what we do is to go through all the pixels in the image and create
textures for each one. The first texture is just the pixel color itself.
The second texture is the average of the four surrounding pixels.
Note: we can calculate it only for the vertex points in the middle of
the squares; for the extra vertex points outside the image we just define
a dummy black texture.
The textures have the same index values as the vertex points.
4.2.10.2.3 Creating the triangles
This one is a bit trickier. Basicly we have to create four triangles
for each "square" between pixels. How many triangles will there be?
Let's examine the creation loop first:
  face_indices
  { (ImageWidth-1)*(ImageHeight-1)*4,
    #declare IndY = 0;
    #while(IndY < ImageHeight-1)
      #declare IndX = 0;
      #while(IndX < ImageWidth-1)

        ...

        #declare IndX = IndX+1;
      #end
      #declare IndY = IndY+1;
    #end
  }
The number of "squares" is one less than the number of pixels in each
direction. That is, the number of squares in the x direction will be one
less than the number of pixels in the x direction. The same for the y
direction. As we want four triangles for each square, the total number of
triangles will then be (ImageWidth-1)*(ImageHeight-1)*4.
Then to create each square we loop the amount of pixels minus one for
each direction.
Now in the inside of the loop we have to create the four triangles.
Let's examine the first one:
        <IndX*2+  IndY    *(ImageWidth*2),
         IndX*2+2+IndY    *(ImageWidth*2),
         IndX*2+1+IndY    *(ImageWidth*2)>,
         IndX*2+  IndY    *(ImageWidth*2),
         IndX*2+2+IndY    *(ImageWidth*2),
         IndX*2+1+IndY    *(ImageWidth*2),
This creates a triangle with a texture in each vertex. The first three
values (the indices to vertex points) are identical to the next three values
(the indices to the textures) because the index values were exactly the same
for both.
The IndX is always multiplied by 2 because we had two vertex
points for each pixel and IndX is basically going through the
pixels. Likewise IndY is always multiplied by
ImageWidth*2 because that's how long a row of index points
is (ie. to get from one row to the next at the same x coordinate we have
to advance ImageWidth*2 in the index values).
These two things are identical in all the triangles. What decides which
vertex point is chosen is the "+1" or "+2" (or "+0" when there's nothing).
For IndX "+0" is the current pixel, "+1" chooses the point in
the middle of the square and "+2" chooses the next pixel. For
IndY "+1" chooses the next row of pixels.
Thus this triangle definition creates a triangle using the vertex point
for the current pixel, the one for the next pixel and the vertex point in
the middle of the square.
The next triangle definition is likewise:
        <IndX*2+  IndY    *(ImageWidth*2),
         IndX*2+  (IndY+1)*(ImageWidth*2),
         IndX*2+1+IndY    *(ImageWidth*2)>,
         IndX*2+  IndY    *(ImageWidth*2),
         IndX*2+  (IndY+1)*(ImageWidth*2),
         IndX*2+1+IndY    *(ImageWidth*2),
This one defines the triangle using the current point, the point in the
next row and the point in the middle of the square.
The next two definitions define the other two triangles:
        <IndX*2+  (IndY+1)*(ImageWidth*2),
         IndX*2+2+(IndY+1)*(ImageWidth*2),
         IndX*2+1+IndY    *(ImageWidth*2)>,
         IndX*2+  (IndY+1)*(ImageWidth*2),
         IndX*2+2+(IndY+1)*(ImageWidth*2),
         IndX*2+1+IndY    *(ImageWidth*2),

        <IndX*2+2+IndY    *(ImageWidth*2),
         IndX*2+2+(IndY+1)*(ImageWidth*2),
         IndX*2+1+IndY    *(ImageWidth*2)>,
         IndX*2+2+IndY    *(ImageWidth*2),
         IndX*2+2+(IndY+1)*(ImageWidth*2),
         IndX*2+1+IndY    *(ImageWidth*2)
