This chapter explains how to use the different OpenGL rendering extensions. Rendering refers to several parts of the OpenGL pipeline: the evaluator stage, rasterization, and per-fragment operations. The following extenstions are described in this chapter:
The ATI_draw_buffers extension allows fragment programs to generate multiple output colors, and provides a mechanism for directing those outputs to multiple color buffers.
Multiple draw buffers are typically useful when generating an image and auxiliary data, multiple versions of an image, or multiple computed results from a fragment program being used for general-purpose computation.
Normally, a fragment program will generate a single output color, result.color, which is written to the color buffer defined by glDrawBuffer(). When a fragment program specifies the option “ATI_draw_buffers”, an implementation-dependent number of output colors, named result.color[n], may be generated, where n ranges from 0 up to the number of draw buffers minus one. The number of draw buffers supported is implementation-dependent, and may be queried by calling glGetIntegerv() with the parameter GL_MAX_DRAW_BUFFERS_ATI. Typically, at least four draw buffers are supported by this extension.
To define the color buffers to which multiple output colors are written, make the following call:
void glDrawBuffersATI(GLsizei n, const GLenum *bufs); |
The parameter n specifies the number of buffers in bufs and bufs is a pointer to an array of symbolic constants specifying the buffer to which each output color is written. The constants may be one of the following:
GL_NONE
GL_FRONT_LEFT
GL_FRONT_RIGHT
GL_BACK_LEFT
GL_BACK_RIGHT
GL_AUX0 through GL_AUXn, where n + 1 is the number of available auxiliary buffers.
The draw buffers being defined correspond in order to the respective output colors. The draw buffer for output colors beyond n is set to GL_NONE.
The constants GL_FRONT, GL_BACK, GL_LEFT, GL_RIGHT, and GL_FRONT_AND_BACK, which may refer to multiple color buffers, are not valid elements of bufs, and their use will generate a GL_INVALID_OPERATION error.
If the “ATI_draw_buffers” fragment program option is not used by a fragment program or if fixed-function fragment processing is being used, then glDrawBuffersATI() specifies a set of draw buffers for the writing of the output color 0 or the output color from fixed-function fragment processing.
The draw buffer corresponding to output color i may be queried by calling glGetIntegerv() with the parameter GL_DRAW_BUFFERi_ATI.
The ATI_separate_stencil extension provides the ability to modify the stencil buffer based on the orientation of the primitive that generated a fragment.
When performing stencil buffer computations which differ for fragments generated by front-facing and back-facing primitives, applications typically must render geometry twice. They use face culling to discard front-facing primitives with one pass and back-facing primitives on the second and change stencil buffer settings prior to each pass. A common example is stencil shadow volumes, where the stencil buffer is to be incremented for front-facing fragments and decremented for back-facing fragments.
By using independent stencil tests and operations depending on fragment orientation, such computations can be performed in a single pass, which may significantly increase performance for geometry-limited applications.
To set the stencil function separately for front-facing and back-facing fragments, make the following call:
void glStencilFuncSeparateATI(GLenum frontfunc, GLenum backfunc, GLint ref,
                              GLuint mask);
|
The parameters frontfunc and backfunc respectively specify the stencil test function used for front-facing and back-facing fragments. The values accepted are the same as for glStencilFunc(), and the initial value of each function is GL_ALWAYS.
The parmater ref specifies the reference value used for both front-facing and back-facing fragments. It is clamped to the range [0, pow(2,s) – 1], where s is the number of bits in the stencil buffer.
The s least significant bits of the mask value are bitwise ANDed with ref and then with the stored stencil value, and the resulting masked value is used in the comparison controlled by {\em func}.
To set the stencil operation separately for front-facing and back-facing fragments, make the following call:
void glStencilOpSeparateATI(GLenum face, GLenum fail, GLenum zfail,
                            GLenum   zpass);
|
The parameter face specifies the orientation for the stencil operation and must be GL_FRONT, GL_BACK, or GL_FRONT_AND_BACK to set both stencil operations to the same values.
The parameters fail, zfail, and zpass respectively specify the operations to perform when the stencil test fails, stencil test passes but depth test fails, and stencil and depth tests both pass. The values accepted are the same as for glStencilOp().
Use the core OpenGL tokens to query for the front-facing stencil state. To query for the back-facing stencil state, call glGetIntegerv() with the following tokens:
GL_STENCIL_BACK_FUNC_ATI
GL_STENCIL_BACK_FAIL_ATI
GL_STENCIL_BACK_PASS_DEPTH_FAIL_ATI
GL_STENCIL_BACK_PASS_DEPTH_PASS_ATI
The NV_point_sprite extension supports application of texture maps to point primitives instead of using a single texture coordinate for all fragments generated by the point. Note that NV_point_sprite is not related to the SGIX_sprite extension described in section “SGIX_sprite—The Sprite Extension”.
When rendering effects such as particle systems, applications often want to draw a small texture (such as a shaded sphere) to represent each particle rather than the set of uniformly shaded fragments normally generated by a GL_POINTS primitive. This can easily be done by rendering a GL_QUADS primitive for each point but at the cost of quadrupling the amount of geometry transferred to the graphics pipeline for each point and of performing additional work to compute the location of each vertex of the quad. Since particle systems typically involves thousands or tens of thousands of particles, this can translate to a large geometry load.
Point sprites allow producing these effects using point primitives instead of quads. Each texture unit can be modified to replace the single S and T texture coordinate for each fragment generated by a point with S and T point sprite coordinates, which are interpolated across the fragments generated by a point. Finally, a global parameter controls the R texture coordinate for point sprites to allow applications to animate slices of a single 3D texture during the lifetime of a point. For example, it allows an application to represent a particle that glows and then fades.
Point sprites are enabled by calling glEnable(GL_POINT_SPRITE_NV). When point sprites are enabled, the state of point antialiasing is ignored so that fragments are generated for the entire viewport square occupied by the point instead of just fragments in a circle filling that viewport square.
When point sprites are enabled, each texture unit may independently determine whether or not the single point texture coordinate is replaced by point sprite texture coordinates by making the following call:
glTexEnvi(GL_POINT_SPRITE_NV, GL_COORD_REPLACE_NV, flag); |
The active texture unit will generate point sprite coordinates if flag is GL_TRUE or will use the point texture coordinate if flag is GL_FALSE.
The point sprite texture coordinates generated for fragments by a point will be the following:
s = 1/2 + ((xf - xw + 1/2) / size) t = 1/2 + ((yf - yw + 1/2) / size) |
The variable items are defined as follows:
| (xf, yf) | Specifies the window coordinates of a fragment generated by the point. | |
| (xw, yw) | Specifies the floating point coordinates of the point center. | |
| size | Specifies the screen-space point width, which depends on the current point width as well as the scaling determined by the current point parameters. |
When 3D texturing is enabled, the R value generated for point sprite coordinates is determined by making the following call:
glPointParameteriNV(GL_POINT_SPRITE_R_MODE_NV, GLint param); |
The following are possible values of param:
| GL_ZERO | The R coordinate generated for all fragments will be zero. This is typically the fastest mode. GL_ZERO is the default. | |
| GL_S | The R coordinate generated for all fragments will be taken from the S coordinate of the point before point sprite coordinates are generated. | |
| GL_R | The R coordinate generated for all fragments will be taken from the R coordinate of the point before point sprite coordinates are generated. |
The NV_occlusion_query extension provides a high-level mechanism to query the visibility of an object and returns a count of the number of pixels that pass the depth test.
Occlusion queries are primarily used to help applications avoid rendering objects that are completely occluded (blocked from visibility) by other objects closer to the viewer. This can result in a significantly reduced geometry load.
Typically, this test consists of the following steps:
Drawing large foreground objects (occluders) that are expected to block background objects
Starting the occlusion test
Drawing simple primitives representing the bounding box of background objects that may be occluded
Ending the occlusion test
Reading back the number of pixels of the bounding box that passed the depth test
If the number of pixels that passed the depth test is zero, then the objects represented by this bounding box are completely occluded and do not need to be drawn. Otherwise, at least some of the objects within the bounding box may be visible and can either be drawn or finer-detailed occlusion queries can be performed on smaller components of the objects. In addition, if the number of pixels is small relative to the size of the bounding box, it may be possible to represent the objects with lower-detailed models.
Some other possible uses for occlusion queries include depth peeling techniques like as order-independent transparency, where an application can stop rendering when further layers will be invisible, and as a replacement for glReadPixels() when performing operations like reading the depth buffer to determine fractional visibility of a light source for lens flare or halo effects.
Use occlusion queries with care, however. Naive use of a query may stall the graphics pipeline and CPU while waiting for query results. To avoid this problem, NV_occlusion_query supports a simple test for the availability of query results. If the query results are not available, the application can do other drawing or compute tasks while waiting for the results to become available.
In addition, the expense of rendering bounding boxes for an occlusion test, while typically small compared to the expense of rendering the objects themselves, can become significant if done too finely (for example, rendering bounding boxes for small objects) or if done frequently when it is unlikely that the bounding boxes will actually be occluded.
Occlusion queries depend on occlusion query objects. As shown in the following code, these objects are represented by object names (of type GLuint), which are managed in exactly the same fashion as texture and display list names—that is, with routines for allocating unused query names, deleting query names, and testing if a name is a valid occlusion query:
void glGenOcclusionQueriesNV(GLsizei n, GLuint *ids); void glDeleteOcclusionQueriesNV(GLsizei n, const GLuint *ids); GLboolean glIsOcclusionQueryNV(GLuint id); |
Occlusion query objects contain a pixel counter, which is initially set to zero. The size (in bits) of this counter is the same for all queries and may be determined by calling glGetIntegerv() with parameter GL_PIXEL_COUNTER_BITS_NV. An occlusion query counter is guaranteed to contain at least 24 bits, supporting pixels counts of at least 16777215, but it may be larger.
To perform occlusion queries, first acquire an unused query name using glGenOcclusionQueriesNV(). Begin the query by making the following call:
void glBeginOcclusionQueryNV(GLuint id); |
The parameter id specifies the name of the query to be created. Then render the geometry to be queried. Whenever a fragment being rendered passes the depth test while an occlusion query is being performed, the pixel counter is incremented by one. In a multisampling situation, the pixel counter is incremented once for each sample whose coverage bit in the fragment is set.
Typically, when rendering bounding boxes for an occlusion test, the color and depth masks are set to GL_FALSE so that the bounding boxes themselves are not drawn to the framebuffer.
To end an occlusion query, make the following call:
void glEndOcclusionQueryNV(void); |
To retrieve the count of pixels that passed the occlusion query, make the following call:
void glGetOcclusionQueryuivNV(GLuint id, GLenum pname, GLuint *params); |
Set the parameter pname to GL_PIXEL_COUNT_NV. The count is returned in the variable pointed to by params. However, as noted earlier, calling glGetOcclusionQueryNV() immediately after ending a query may cause the graphics pipeline to stall.
To avoid stalling, first determine whether the query count is available by calling glGetOcclusionQueryuiNV() with a pname of GL_PIXEL_COUNT_AVAILABLE_NV. If the value returned in params is GL_TRUE, then the count is available, and a query of GL_PIXEL_COUNT_NV may be performed without stalling. Otherwise, the application may perform additional work unrelated to the occlusion query and test periodically for the result. Note that the first call to determine GL_PIXEL_COUNT_AVAILABLE_NV for a query should be preceded by glFlush() to ensure that the glEndOcclusionQueryNV() operation for that query has reached the graphics pipeline. Otherwise, it is possible to spin indefinitely on the query.
Example 9-1 shows a simple use of NV_occlusion_query.
Example 9-1. NV_occlusion_query Example
GLuint occlusionQuery[numQuery]; /* names for each query to perform */

glGenOcclusionQueriesNV(numQuery, occlusionQuery);

/* Prior to this point, first render the foreground occluders */
/* Disable color and depth mask writes while rendering bounding boxes */
glColorMask(GL_FALSE, GL_FALSE, GL_FALSE, GL_FALSE);
glDepthMask(GL_FALSE);
/* Also disable texturing, fragment shaders, and any other
 * unneccessary functionality, since nothing will actually be
 * written to the screen.
 */

/* Now loop over numQuery objects, performing an occlusion query for each */
for (i = 0; i < numQuery; i++) {
    glBeginOcclusionQueryNV(occlusionQuery[i]);
    /* Render bounding box for object i */
    glEndOcclusionQueryNV();
}

/* Enable color and depth mask writes, and any other state disabled
 * above prior to the occlusion queries
 */
glColorMask(GL_TRUE, GL_TRUE, GL_TRUE, GL_TRUE);
glDepthMask(GL_TRUE);

/* If possible, perform other computations or rendering at this
 * point, while waiting for occlusion results to become available.
 */

/* Now obtain pixel counts for each query, and draw objects based
 * on those counts.
 */
for (i = 0; i < numQuery; i++) {
    GLuint pixelCount;

    glGetOcclusionQueryuivNV(occlusionQuery[i], GL_PIXEL_COUNT_NV,
                             &pixelCount);

    if (pixelCount > 0) {
        /* Render geometry for object i here */
    }
|
Blending refers to the process of combining color values from an incoming pixel fragment (a source) with current values of the stored pixel in the framebuffer (the destination). The final effect is that parts of a scene appear translucent. You specify the blending operation by calling glBlendFunc(), then enable or disable blending using glEnable() or glDisable() with GL_BLEND specified.
Blending is described in the first section of Chapter 7, “Blending, Antialiasing, Fog, and Polygon Offset” of the OpenGL Programming Guide. The section also lists a number of sample uses of blending.
This section explains how to use extensions that support color blending for images and rendered geometry in a variety of ways:
-

Note: These three extensions were promoted to a standard part of OpenGL 1.2. Use the equivalent OpenGL 1.2 interfaces (for example, with the EXT suffixes removed) with new applications, unless they must run on InfiniteReality, InfinitePerformance, or Fuel systems. The extensions are supported on all current Silicon Graphics systems.
The standard blending feature allows you to blend source and destination pixels. The constant color blending extension, EXT_blend_color, enhances this capability by defining a constant color that you can include in blending equations.
Constant color blending allows you to specify input source with constant alpha that is not 1 without actually specifying the alpha for each pixel. Alternatively, when working with visuals that have no alpha, you can use the blend color for constant alpha. This also allows you to modify a whole incoming source by blending with a constant color (which is faster than clearing to that color). In effect, the image looks as if it were viewed through colored glasses.
To use a constant color for blending, follow these steps:
Call glBlendColorEXT(), whose format follows, to specify the blending color:
void glBlendColorEXT( GLclampf red, GLclampf green, GLclampf blue,
            GLclampf alpha )
The four parameters are clamped to the range [0,1] before being stored. The default value for the constant blending color is (0,0,0,0).
Call glBlendFunc() to specify the blending function, using one of the tokens listed in Table 9-1 as source or destination factor, or both.
Table 9-1. Blending Factors Defined by the Blend Color Extension
Constant | Computed Blend Factor |
|---|---|
GL_CONSTANT_COLOR_EXT | (Rc, Gc, Bc, Ac) |
GL_ONE_MINUS_CONSTANT_COLOR_EXT | (1, 1, 1, 1) – (Rc, Gc, Bc, Ac) |
GL_CONSTANT_ALPHA_EXT | (Ac, Ac, Ac, Ac) |
GL_ONE_MINUS_CONSTANT_ALPHA_EXT | (1, 1, 1, 1) – (Ac, Ac, Ac, Ac) |
Rc, Gc, Bc, and Ac are the four components of the constant blending color. These blend factors are already in the range [0,1].
You can, for example, fade between two images by drawing both images with Alpha and 1-Alpha as Alpha goes from 1 to 0, as in the following code fragment:
glBlendFunc(GL_ONE_MINUS_CONSTANT_COLOR_EXT, GL_CONSTANT_COLOR_EXT);
for (alpha = 0.0; alpha <= 1.0; alpha += 1.0/16.0) {
    glClear(GL_COLOR_BUFFER_BIT);
    glDrawPixels(width, height, GL_RGB, GL_UNSIGNED_BYTE, image0);
    glEnable(GL_BLEND);
    glBlendColorEXT(alpha, alpha, alpha, alpha);
    glDrawPixels(width, height, GL_RGB, GL_UNSIGNED_BYTE, image1);
    glDisable(GL_BLEND);
    glXSwapBuffers(display, window);
}
|
The minmax blending extension, EXT_blend_minmax, extends blending capability by introducing two new equations that produce the minimum or maximum color components of the source and destination colors. Taking the maximum is useful for applications such as maximum intensity projection (MIP) in medical imaging.
This extension also introduces a mechanism for defining alternate blend equations. Note that even if the minmax blending extension is not supported on a given system, that system may still support the logical operation blending extension or the subtract blending extension. When these extensions are supported, the glBlendEquationEXT() function is also supported.
To specify a blend equation, call glBlendEquationEXT(), whose format follows:
void glBlendEquationEXT(GLenum mode) |
The mode parameter specifies how source and destination colors are combined. The blend equations GL_MIN_EXT, GL_MAX_EXT, and GL_LOGIC_OP_EXT do not use source or destination factors; that is, the values specified with glBlendFunc() do not apply.
If mode is set to GL_FUNC_ADD_EXT, then the blend equation is set to GL_ADD, the equation used currently in OpenGL 1.0. The glBlendEquationEXT() reference page lists other modes. These modes are also discussed in “Blend Subtract Extension”. While OpenGL 1.0 defines logic operation only on color indices, this extension extends the logic operation to RGBA pixel groups. The operation is applied to each component separately.
The blend subtract extension, EXT_blend_subtract, provides two additional blending equations that can be used by glBlendEquationEXT(). These equations are similar to the default blending equation but produce the difference of its left- and right-hand sides, rather than the sum. See the man page for glBlendEquationEXT() for a detailed description.
Image differences are useful in many image-processing applications; for example, comparing two pictures that may have changed over time.
Standard OpenGL defines three fog modes: GL_LINEAR, GL_EXP (exponential), and GL_EXP2 (exponential squared). Visual simulation systems can benefit from more sophisticated atmospheric effects, such as those provided by the fog function extension.
The fog function extension, SGIS_fog_function, allows you to define an application-specific fog blend factor function. The function is defined by a set of control points and should be monotonic. Each control point is represented as a pair of the eye-space distance value and the corresponding value of the fog blending factor. The minimum number of control points is 1. The maximum number is implementation-dependent.
To specify the function for computing the blending factor, call glFogFuncSGIS() with points pointing at an array of pairs of floating point values and n set to the number of value pairs in points. The first value of each value pair in points specifies a value of eye-space distance (should be nonnegative), and the second value of each value pair specifies the corresponding value of the fog blend factor (should be in the [0.0, 1.0] range). If there is more than one point, the order in which the points are specified is based on the following requirements:
The distance value of each point is not smaller than the distance value of its predecessor.
The fog factor value of each point is not bigger than the fog factor value of its predecessor.
Replacing any previous specification that may have existed, the n value pairs in points completely specify the function. At least one control point should be specified. The maximum number of control points is implementation-dependent and may be retrieved by calling glGetIntegerv() with a pname of GL_MAX_FOG_FUNC_POINTS_SGIS while the number of points actually specified for the current fog function may be retrieved with a pname of FOG_FUNC_POINTS_SGIS.
Initially the fog function is defined by a single point (0.0, 1.0). The fog factor function is evaluated by fitting a curve through the points specified by glFogFuncSGIS(). This curve may be linear between adjacent points, or it may be smoothed, but it will pass exactly through the points, limited only by the resolution of the implementation. The value pair with the lowest distance value specifies the fog function value for all values of distance less than or equal to that pair's distance. Likewise, the value pair with the greatest distance value specifies the function value for all values of distance greater than or equal to that pair's distance.
If pname is GL_FOG_MODE and param is, or params points to an integer GL_FOG_FUNC_SGIS, then the application-specified fog factor function is selected for the fog calculation.
The following simple example program for the fog function extension can be executed well only on those platforms where the extension is supported (VPro and InfiniteReality systems).
#include <stdio.h>
#include <stdlib.h>
#include <GL/gl.h>
#include <GL/glut.h>

/* Simple demo program for fog-function. Will work only on machines
 * where SGIS_fog_func is supported.
 *
 * Press `f' key to toggle between fog and no fog
 * Pres ESC to quit
 *
 * cc fogfunc.c -o fogfunc -lglut -lGLU -lGL -lXmu -lX11
 */

#define ESC 27

GLint width = 512, height = 512;
GLint dofog = 1;		                          /* fog enabled by default */
GLfloat fogfunc[] = {		                     /* fog-function profile */
  6.0, 1.0,			/* (distance, blend-factor) pairs */
  8.0, 0.5,
  10.0, 0.1,
  12.0, 0.0,
};

void init(void)
{
  GLUquadric *q = gluNewQuadric();
  GLfloat ambient[] = {0.3, 0.3, 0.2, 1.0};
  GLfloat diffuse[] = {0.8, 0.7, 0.8, 1.0};
  GLfloat specular[] = {0.5, 0.7, 0.8, 1.0};
  GLfloat lpos[] = {0.0, 10.0, -20.0, 0.0}; /* infinite light */
  GLfloat diff_mat[] = {0.1, 0.2, 0.5, 1.0};
  GLfloat amb_mat[] = {0.1, 0.2, 0.5, 1.0};
  GLfloat spec_mat[] = {0.9, 0.9, 0.9, 1.0};
  GLfloat shininess_mat[] = {0.8, 0.0};
  GLfloat amb_scene[] = {0.2, 0.2, 0.2, 1.0};
  GLfloat fog_color[] = {0.0, 0.0, 0.0, 1.0};

  glClearColor(0.0, 0.0, 0.0, 1.0);
  glClear(GL_COLOR_BUFFER_BIT | GL_DEPTH_BUFFER_BIT);

  glMatrixMode(GL_PROJECTION);
  glLoadIdentity();
  glFrustum(-4.0, 4.0, -4.0, 4.0, 4.0, 30.0);

  glMatrixMode(GL_MODELVIEW);
  glLoadIdentity();

  /* Setup lighting */

  glLightfv(GL_LIGHT0, GL_AMBIENT, ambient);
  glLightfv(GL_LIGHT0, GL_SPECULAR, specular);
  glLightfv(GL_LIGHT0, GL_DIFFUSE, diffuse);
  glLightfv(GL_LIGHT0, GL_POSITION, lpos);
  glLightModelfv(GL_LIGHT_MODEL_AMBIENT, amb_scene);

  glMaterialfv(GL_FRONT, GL_DIFFUSE, diff_mat);
  glMaterialfv(GL_FRONT, GL_AMBIENT, amb_mat);
  glMaterialfv(GL_FRONT, GL_SPECULAR, spec_mat);
  glMaterialfv(GL_FRONT, GL_SHININESS, shininess_mat);

  glEnable(GL_LIGHT0);
  glEnable(GL_LIGHTING);

  /* Setup fog function */

  glFogfv(GL_FOG_COLOR, fog_color);
  glFogf(GL_FOG_MODE, GL_FOG_FUNC_SGIS);
  glFogFuncSGIS(4, fogfunc);
  glEnable(GL_FOG);

  /* Setup scene */

  glTranslatef(0.0, 0.0, -6.0);
  glRotatef(60.0, 1.0, 0.0, 0.0);

  glNewList(1, GL_COMPILE);
  glPushMatrix();
  glTranslatef(2.0, 0.0, 0.0);
  glColor3f(1.0, 1.0, 1.0);
  gluSphere(q, 1.0, 40, 40);
  glTranslatef(-4.0, 0.0, 0.0);
  gluSphere(q, 1.0, 40, 40);
  glTranslatef(0.0, 0.0, -4.0);
  gluSphere(q, 1.0, 40, 40);
  glTranslatef(4.0, 0.0, 0.0);
  gluSphere(q, 1.0, 40, 40);
  glTranslatef(0.0, 0.0, -4.0);
  gluSphere(q, 1.0, 40, 40);
  glTranslatef(-4.0, 0.0, 0.0);
  gluSphere(q, 1.0, 40, 40);
  glPopMatrix();
  glEndList();
}

void display(void)
{
  glClear(GL_COLOR_BUFFER_BIT | GL_DEPTH_BUFFER_BIT);
  (dofog) ? glEnable(GL_FOG) : glDisable(GL_FOG);
  glCallList(1);
  glutSwapBuffers();
}

void kbd(unsigned char key, int x, int y)
{
  switch (key) {
  case `f':			                                     /* toggle fog enable */
    dofog = 1 - dofog;
    glutPostRedisplay();
    break;

  case ESC:			/* quit!! */
    exit(0);
  }
}

main(int argc, char *argv[])
{
  glutInit(&argc, argv);
  glutInitDisplayMode(GLUT_DOUBLE | GLUT_RGBA | GLUT_DEPTH);
  glutInitWindowSize(width, height);
  glutCreateWindow(“Fog Function”);
  glutKeyboardFunc(kbd);
  glutDisplayFunc(display);

  init();
  glutMainLoop();
}
|
| Note: This extension is not supported on Onyx4 and Silicon Graphics Prism systems. Applications can achieve similar functionality using fragment programs. |
The fog offset extension, SGIX_fog_offset, allows applications to make objects look brighter in a foggy environment.
When fog is enabled, it is equally applied to all objects in a scene. This can create unrealistic effects for objects that are especially bright (light sources like automobile headlights, runway landing lights, or florescent objects, for instance). To make such objects look brighter, fog offset may be subtracted from the eye distance before it is used for the fog calculation. This works appropriately because the closer an object is to the eye, the less obscured by fog it is.
To use fog with a fog offset, follow these steps:
Call glEnable() with the GL_FOG argument to enable fog.
Call glFog*() to choose the color and the equation that controls the density.
The above two steps are explained in more detail in “Using Fog” on page 240 of the OpenGL Programming Guide, Second Edition.
Call glEnable() with argument GL_FOG_OFFSET_SGIX.
Call glFog*() with a pname value of GL_FOG_OFFSET_VALUE_SGIX and four params. The first three parameters are point coordinates in the eye space and the fourth parameter is an offset distance in the eye space.
The GL_FOG_OFFSET_VALUE_SGIX value specifies point coordinates in eye space and offset amount toward the viewpoint. It is subtracted from the depth value to make objects closer to the viewer right before fog calculation. As a result, objects look less foggy. Note that these point coordinates are needed for OpenGL implementations that use z-based fog instead of eye space distance. The computation of the offset in the z dimension is accurate only in the neighborhood of the specified point.
If the final distance is negative as a result of offset subtraction, it is clamped to 0. In the case of perspective projection, fog offset is properly calculated for the objects surrounding the given point. If objects are too far away from the given point, the fog offset value should be defined again. In the case of ortho projection, the fog offset value is correct for any object location.
Call glDisable() with argument GL_FOG_OFFSET_SGIX to disable fog offset.
There are two version of the multisample extension:
-
Note: Functionality-wise, the ARB and SGIS versions of this extension are very similar but not identical. The SGIS version is only supported on InfiniteReality systems. The extension has been promoted to a standard ARB extension, and new applications should use the equivalent ARB interface, unless they must run on InfiniteReality systems. The ARB version of this extension is only supported on Silicon Graphics Prism systems.
SGIS_multisample differs from ARB_multisample in the following respects:
All SGIS suffixes on function and token names are changed to ARB.
The term mask is changed to coverage in token and function names.
The ability to change the sample pattern between rendering passes, described in section “Accumulating Multisampled Images”, is only supported by the SGIS version of the extension.
Table 9-2 shows the overall mapping between SGIS and ARB tokens and functions.
Table 9-2. Mapping of SGIS and ARB tokens for Multisampling
SGIS_multisample Token | ARB_multisample Token |
|---|---|
SampleMaskSGIS | SampleCoverageARB |
GLX_SAMPLE_BUFFERS_SGIS | GLX_SAMPLE_BUFFERS_ARB |
GLX_SAMPLES_SGIS | GLX_SAMPLES_ARB |
MULTISAMPLE_SGIS | MULTISAMPLE_ARB |
SAMPLE_ALPHA_TO_MASK_SGIS | SAMPLE_ALPHA_TO_COVERAGE_ARB |
SAMPLE_ALPHA_TO_ONE_SGIS | SAMPLE_ALPHA_TO_ONE_ARB |
SAMPLE_MASK_SGIS | SAMPLE_COVERAGE_ARB |
MULTISAMPLE_BIT_EXT | MULTISAMPLE_BIT_ARB |
SAMPLE_BUFFERS_SGIS | SAMPLE_BUFFERS_ARB |
SAMPLES_SGIS | SAMPLES_ARB |
SAMPLE_MASK_VALUE_SGIS | SAMPLE_COVERAGE_VALUE_ARB |
SAMPLE_MASK_INVERT_SGIS | SAMPLE_COVERAGE_INVERT_ARB |
SamplePatternSGIS | Not supported |
SAMPLE_PATTERN_SGIS | Not supported |
1PASS_SGIS | Not supported |
2PASS_0_SGIS | Not supported |
2PASS_1_SGIS | Not supported |
4PASS_0_SGIS | Not supported |
4PASS_1_SGIS | Not supported |
4PASS_2_SGIS | Not supported |
4PASS_3_SGIS | Not supported |
The multisample extension, SGIS_multisample, provides a mechanism to antialias all OpenGL primitives: points, lines, polygons, bitmaps, and images.
This section explains how to use multisampling and explores what happens when you use it. It describes the following topics:
Multisampling works by sampling all primitives multiple times at different locations within each pixel; in effect, multisampling collects subpixel information. The result is an image that has fewer aliasing artifacts.
Because each sample includes depth and stencil information, the depth and stencil functions perform equivalently in the single-sample mode. A single pixel can have 4, 8, 16, or even more subsamples, depending on the platform.
When you use multisampling and read back color, you get the resolved color value (that is, the average of the samples). When you read back stencil or depth, you typically get back a single sample value rather than the average. This sample value is typically the one closest to the center of the pixel.
Multisample antialiasing is most valuable for rendering polygons because it correctly handles adjacent polygons, object silhouettes, and even intersecting polygons. Each time a pixel is updated, the color sample values for each pixel are resolved to a single, displayable color.
For points and lines, the “smooth” antialiasing mechanism provided by standard OpenGL results in a higher-quality image and should be used instead of multisampling (see “Antialiasing” in Chapter 7, “Blending, Antialiasing, Fog, and Polygon Offset” of the OpenGL Programming Guide).
The multisampling extension lets you alternate multisample and smooth antialiasing during the rendering of a single scene; so, it is possible to mix multisampled polygons with smooth lines and points. See “Multisampled Points” and “Multisampled Lines” for more information.
To use multisampling in your application, select a multisampling-capable visual by calling glXChooseVisual() with the following items in attr_list:
Multisampling is enabled by default. To query whether multisampling is enabled, make the following call:
glIsEnabled(MULTISAMPLE_SGIS) |
To turn off multisampling, make the following call:
glDisable(MULTISAMPLE_SGIS) |
Advanced multisampling options provide additional rendering capabilities. This section describes the following features:
Using a multisample mask to choose how many samples are writable
Using alpha values to feather-blend texture edges
Using the accumulation buffer with multisampling
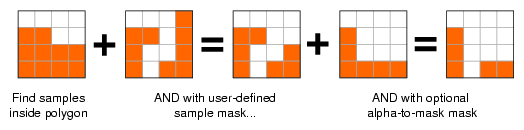
The following steps, illustrated in Figure 9-1, shows how the subsamples in one pixel are turned on and off.
The primitive is sampled at the locations defined by a sample pattern. If a sample is inside the polygon, it is turned on; otherwise, it is turned off. This produces a coverage mask.
The coverage mask is then ANDed with a user-defined sample mask, defined by a call to glSampleMaskSGIS() (see “Using a Multisample Mask to Fade Levels of Detail”).
You may also choose to convert the alpha value of a fragment to a mask and AND it with the coverage mask from step 2.
Enable GL_SAMPLE_ALPHA_TO_MASK_SGIS to convert alpha to the mask. The fragment alpha value is used to generate a temporary mask, which is then ANDed with the fragment mask.
The two processes—using a multisample mask created by glSampleMaskSGIS() and using the alpha value of the fragment as a mask—can both be used for different effects.
When GL_SAMPLE_ALPHA_TO_MASK_SGIS is enabled, it is usually appropriate to enable GL_SAMPLE_ALPHA_TO_ONE_SGIS to convert the alpha values to 1 before blending. Without this option, the effect would be colors that are twice as transparent.
| Note: When you use multisampling, blending reduces performance. Therefore, when possible, disable blending and instead use GL_SAMPLE_MASK_SGIS or GL_ALPHA_TO_MASK. |
Multisampling can be used to solve the problem of blurred edges on textures with irregular edges, such as tree textures, that require extreme magnification. When the texture is magnified, the edges of the tree look artificial, as if the tree were a paper cutout. To make them look more natural by converting the alpha to a multisample mask, you can obtain several renderings of the same primitive, each with the samples offset by a specific amount. See “Accumulating Multisampled Images” for more information.
The same process can be used to achieve screen door transparency. If you draw only every other sample, the background shines through for all other samples. This results in a transparent image. This is useful because it does not require the polygons to be sorted from back to front. It is also faster because it does not require blending.
You can use a mask to specify a subset of multisample locations to be written at a pixel. This feature is useful for fading the level of detail in visual simulation applications. You can use multisample masks to perform the blending from one level of detail of a model to the next by rendering the additional data in the detailed model using a steadily increasing percentage of subsamples as the viewpoint nears the object.
To achieve this blending between a simpler and a more detailed representation of an object or to achieve screen door transparency (described in the previous section), either call glSampleMaskSGIS() or use the alpha values of the object and call glSampleAlphaToMaskSGIS().
The following is the format for glSampleMaskSGIS():
void glSampleMaskSGIS (GLclampf value, boolean invert) |
The parameters are defined as follows:
| value | Specifies coverage of the modification mask clamped to the range [0, 1]. 0 implies no coverage, and 1 implies full coverage. | |
| invert | Should be GL_FALSE to use the modification mask implied by value or GL_TRUE to use the bitwise inverse of that mask. |
To define a multisample mask using glSampleMaskSGIS(), follow these steps:
Call glSampleMaskSGIS() with, for example, value set to .25 and invert set to GL_FALSE.
Render the object once for the more complex level of detail.
Call glSampleMaskSGIS() again with, for example, value set to .25 and invert set to GL_TRUE.
Render the object for the simpler level of detail.
This time, the complementary set of samples is used because of the use of the inverted mask.
Display the image.
Repeat the process for larger sample mask values of the mask as needed (as the viewpoint nears the object).
You can enhance the quality of the image even more by making several passes and adding the result in the accumulation buffer. The accumulation buffer averages several renderings of the same primitive. For multipass rendering, different sample locations need to be used in each pass to achieve high quality.
When an application uses multisampling in conjunction with accumulation, it should call glSamplePatternSGIS() with one of the following patterns as an argument:
GL_1PASS_SGIS is designed to produce a well-antialiased result in a single rendering pass (this is the default).
GL_2PASS_0_SGIS and GL_2PASS_1_SGIS together specify twice the number of sample points per pixel. You should first completely render a scene using pattern GL_2PASS_0_SGIS, then completely render it again using GL_2PASS_1_SGIS. When the two images are averaged using the accumulation buffer, the result is as if a single pass had been rendered with 2×ΓΛ_ΣΑΜΠΛΕΣ_ΣΓΙΣ sample points.
GL_4PASS_0_SGIS, GL_4PASS_1_SGIS, GL_4PASS_2_SGIS, and GL_4PASS_3_SGIS together define a pattern of 4×ΓΛ_ΣΑΜΠΛΕΣ_ΣΓΙΣ sample points. They can be used to accumulate an image from four complete rendering passes.
Accumulating multisample results can also extend the capabilities of your system. For example, if you have only enough resources to allow four subsamples, but you are willing to render the image twice, you can achieve the same effect as multisampling with eight subsamples. Note that you do need an accumulation buffer, which also takes space.
To query the sample pattern, call glGetIntegerv() with pname set to GL_SAMPLE_PATTERN_SGIS. The pattern should be changed only between complete rendering passes.
For more information, see “The Accumulation Buffer,” on page 394 of the OpenGL Programming Guide.
This section briefly describes multisampled points, lines, polygons, pixels, and bitmaps.
If you are using multisampling, the value of the smoothing hint (GL_POINT_SMOOTH_HINT or GL_LINE_SMOOTH_HINT) is ignored. Because the quality of multisampled points may not be as good as that of antialiased points, remember that you can turn multisampling on and off as needed to achieve multisampled polygons and antialiased points.
| Note: On InfiniteReality systems, you achieve higher-quality multisampled points by setting GL_POINT_SMOOTH_HINT to GL_NICEST (though this mode is slower and should be used with care). |
glHint(GL_POINT_SMOOTH_HINT, GL_NICEST) |
The result is round points. Points may disappear or flicker if you use them without this hint. See the next section for caveats on using multisampling with smooth points and lines.
Lines are sampled into the multisample buffer as rectangles centered on the exact zero-area segment. Rectangle width is equal to the current line width. Rectangle length is exactly equal to the length of the segment. Rectangles of colinear, abutting line segments abut exactly so that no subsamples are missed or drawn twice near the shared vertex.
Just like points, lines on InfiniteReality systems look better when drawn “smooth” than they do with multisampling.
Polygons are sampled into the multisample buffer much as they are into the standard single-sample buffer. A single color value is computed for the entire pixel, regardless of the number of subsamples at that pixel. Each sample is then written with this color if and only if it is geometrically within the exact polygon boundary.
If the depth buffer is enabled, the correct depth value at each multisample location is computed and used to determine whether that sample should be written or not. If stencil is enabled, the test is performed for each sample.
Polygon stipple patterns apply equally to all sample locations at a pixel. All sample locations are considered for modification if the pattern bit is 1. None is considered if the pattern bit is 0.
There are two versions of the point parameters extension:
SGIS_point_parameters
Note: Functionality-wise, the ARB and SGIS versions of this extension are identical. The SGIS version is only supported on InfiniteReality systems. The extension has been promoted to a standard ARB extension, and new applications should use the equivalent ARB interface, unless they must run on InfiniteReality systems. The ARB version of this extension is only supported on Silicon Graphics Prism systems.
The following descriptions refer to the SGIS version of the extension. When using the ARB version, simply replace the SGIS suffix on function and token names with ARB, except (as noted later) for GL_DISTANCE_ATTENUATION_SGIS. In this case, use GL_POINT_DISTANCE_ATTENUATION_ARB instead.
The point parameter extension, SGIS_point_parameters can be used to render tiny light sources, commonly referred to as light points. The extension is useful, for example, in an airport runway simulation. As the plane moves along the runway, the light markers grow larger as they approach.
By default, a fixed point size is used to render all points, regardless of their distance from the eye point. Implementing the runway example or a similar scene would be difficult with this behavior. This extension is useful in the following two ways:
It allows the size of a point to be affected by distance attenuation; that is, the point size decreases as the distance of the point from the eye increases.
It increases the dynamic range of the raster brightness of points. In other words, the alpha component of a point may be decreased (and its transparency increased) as its area shrinks below a defined threshold. This is done by controlling the mapping from the point size to the raster point area and point transparency.
The new point size derivation method applies to all points while the threshold applies to multisample points only. The extension makes this behavior available with the following constants:
All parameters of the glPointParameterfSGIS() and glPointParameterfvSGIS() functions set various values applied to point rendering. The derived point size is defined to be the size provided as an argument to glPointSize() modulated with a distance attenuation factor.
To use the point parameter extension, call glPointParameter*SGIS() with the following arguments:
| pname | GL_POINT_SIZE_MIN_SGIS, | ||||
| param | When pname is GL_POINT_SIZE_MIN_SGIS, GL_POINT_SIZE_MAX_SGIS, or GL_POINT_FADE_THRESHOLD_SIZE_SGIS, param is respectively set to the single numeric value you want to set for the minimum size, maximum size, or threshold size of the point. When pname is GL_DISTANCE_ATTENUATION_SGIS, param is a pointer to an array of three coefficients in order: a, b, and c, defining the distance attention coefficients for point size. The distance attenuation equation is described in section “Point Parameters Background Information”.
|
A point parameters example program is available as part of the developer toolbox. It allows you to change the following attributes directly:
Values of the distance attenuation coefficients (see “Point Parameters Background Information” and the point parameters specification)
Fade threshold size
Minimum and maximum point size
The following code fragment illustrates how to change the fade threshold.
Example 9-2. Point Parameters Example
GLvoid
decFadeSize( GLvoid )
{
#ifdef  GL_SGIS_point_parameters
    if (pointParameterSupported) {
        if ( fadeSize > 0 ) fadeSize -= 0.1;
        printf( "fadeSize = %4.2f\n", fadeSize );
        glPointParameterfSGIS( GL_POINT_FADE_THRESHOLD_SIZE_SGIS, fadeSize );
        glutPostRedisplay();
    } else {
        fprintf( stderr,
                   "GL_SGIS_point_parameters not supported
                    on this machine\n");
    }
#else
    fprintf( stderr,
               "GL_SGIS_point_parameters not supported
                on this machine\n");
#endif
|
Minimum and maximum point size and other elements can also be changed; see the complete example program in the Developer Toolbox.
The raster brightness of a point is a function of the point area, point color, and point transparency, and the response of the display's electron gun and phosphor. The point area and the point transparency are derived from the point size, currently provided with the size parameter of glPointSize().
This extension defines a derived point size to be closely related to point brightness. The brightness of a point is given by the following equation:
dist_atten(d) = 1 / (a + b * d + c * d^2) brightness(Pe) = Brightness * dist_atten(|Pe|) |
Pe is the point in eye coordinates, and Brightness is some initial value proportional to the square of the size provided with glPointSize(). The raster brightness is simplified to be a function of the rasterized point area and point transparency:
area(Pe) = brightness (Pe) if brightness(Pe) >= Threshold_Area area(Pe) = Theshold_Area otherwise factor(Pe) = brightness(Pe)/Threshold_Area alpha(Pe) = Alpha * factor(Pe) |
Alpha comes with the point color (possibly modified by lighting). Threshold_Area is in area units. Thus, it is proportional to the square of the threshold you provide through this extension.
| Note: For more background information, see the specification of the point parameters extension. |
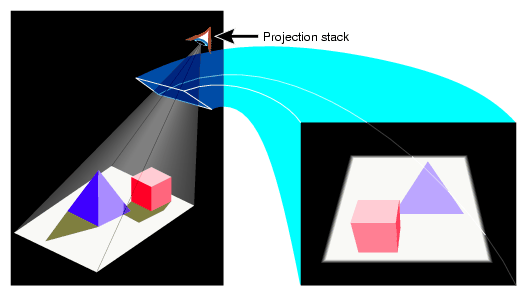
The reference plane extension, SGIX_reference_plane, allows applications to render a group of coplanar primitives without depth-buffering artifacts. This is accomplished by generating the depth values for all the primitives from a single reference plane rather than from the primitives themselves. Using the reference plane extension ensures that all primitives in the group have exactly the same depth value at any given sample point, no matter what imprecision may exist in the original specifications of the primitives or in the OpenGL coordinate transformation process.
| Note: This extension is supported only on InfiniteReality systems. |
The reference plane is defined by a four-component plane equation. When glReferencePlaneSGIX() is called, the equation is transformed by the adjoint of the composite matrix, the concatenation of model-view and projection matrices. The resulting clip-coordinate coefficients are transformed by the current viewport when the reference plane is enabled.
If the reference plane is enabled, a new z coordinate is generated for a fragment (xf, yf, zf). This z coordinate is generated from (xf, yf); it is given the same z value that the reference plane would have at (xf, yf).
Having such an auto-generated z coordinate is useful in situations where the application is dealing with a stack of primitives. For example, assume a runway for an airplane is represented by the following:
A permanent texture on the bottom
A runway markings texture on top of the pavement
Light points representing runway lights on top of everything
All three layers are coplanar, yet it is important to stack them in the right order. Without a reference plane, the bottom layers may show through due to precision errors in the normal depth rasterization algorithm.
If you know in advance that a set of graphic objects will be in the same plane, follow these steps:
Call glEnable() with argument GL_REFERENCE_PLANE_SGIX.
Call glReferencePlane() with the appropriate reference plane equation to establish the reference plane. The form of the reference plane equation is equivalent to that of an equation used by glClipplane() (see page 137 of the OpenGL Programming Guide, Second Edition).
Draw coplanar geometry that shares this reference plane.
Call glDisable() with argument GL_REFERENCE_PLANE_SGIX.
The following are the ARB and SGIX versions of the three shadow extensions:
-
Note: Functionality-wise, the ARB and SGIX versions of these extension are identical. The SGIX versions are only supported on InfiniteReality systems. The extensions have been promoted to standard ARB extensions, and new applications should use the equivalent ARB interface, unless they must run on InfiniteReality systems. The ARB versions of these extensions are only supported on Silicon Graphics Prism systems.
The following descriptions refer to the SGIX version of the extension. When using the ARB version, simply replace the SGIX suffix on function and token names with ARB, except (as noted later) for GL_SHADOW_AMBIENT_SGIX. In this case, use GL_TEXTURE_COMPARE_FAIL_VALUE_ARB instead.
This section describes three SGIX extensions that are used together to create shadows:
| SGIX_depth_texture | Defines a new depth texture internal format. While this extension has other potential uses, it is currently used for shadows only. | |
| SGIX_shadow | Defines two operations that can be performed on texture values before they are passed to the filtering subsystem. | |
| SGIX_shadow_ambient | Allows for a shadow that is not black but instead has a different brightness. |
This section first explores the concepts behind using shadows in an OpenGL program. It then describes how to use the extension in the following sections:
Code fragments from an example program are used throughout this section.
| Note: A complete example program, shadowmap.c, is available as part of the Developer's Toolbox. |
The basic assumption used by the shadow extension is that an object is in shadow when something else is closer to the light source than that object is.
Using the shadow extensions to create shadows in an OpenGL scene consists of several conceptual steps:
The application has to check that both the depth texture extension and the shadow extension are supported.
The application creates a shadow map, an image of the depth buffer from the point of view of the light.
The application renders the scene from the point of view of the light source and copies the resulting depth buffer to a texture with one of the following internal formats:
GL_DEPTH_COMPONENT
GL_DEPTH_COMPONENT16_SGIX
GL_DEPTH_COMPONENT24_SGIX
GL_DEPTH_COMPONENT32_SGIX
The SGIX formats are part of the depth texture extension.
The application renders the scene from the normal viewpoint. In that process, it sets up texture coordinate generation and the texture coordinate matrix such that for each vertex, the r coordinate is equal to the distance from the vertex to the plane used to construct the shadow map.
Projection depends on the type of light. Normally, a finite light (spot) is most appropriate. In that case, perspective projection is used. An infinite directional light may also give good results because it does not require soft shadows.
Note that diffuse lights give only soft shadows and are, therefore, not well suited, although texture filtering will result in some blurriness. Note that it is theoretically possible to do an ortho projection for directional infinite lights. The lack of soft shadowing is not visually correct but may be acceptable.
For this second rendering pass, the application then enables the texture parameter GL_TEXTURE_COMPARE_SGIX, which is part of the shadow extension and renders the scene once more. For each pixel, the distance from the light, which was generated by interpolating the r texture coordinate, is compared with the shadow map stored in texture memory. The results of the comparison show whether the pixel being textured is in shadow.
The application can then draw each pixel that passes the comparison with luminance 1.0 and each shadowed pixel with a luminance of zero or use the shadow ambient extension to apply ambient light with a value between 0 and 1 (for example, 0.5).
To create the shadow map, the application renders the scene with the light position as the viewpoint and saves the depth map into a texture image, as illustrated in the following code fragment:
static void
generate_shadow_map(void)
{
  int x, y;
  GLfloat log2 = log(2.0);

  x = 1 << ((int) (log((float) width) / log2));
  y = 1 << ((int) (log((float) height) / log2));
  glViewport(0, 0, x, y);
  render_light_view();

  /* Read in frame-buffer into a depth texture map */
glCopyTexImage2DEXT(GL_TEXTURE_2D, 0, GL_DEPTH_COMPONENT16_SGIX,
      0, 0, x, y, 0);

glViewport(0, 0, width, height);
}
|
After generating the texture map, the application renders the scene from the normal viewpoint but with the purpose of generating comparison data. That is, use glTexgen() to generate texture coordinates that are identical to vertex coordinates. The texture matrix then transforms all pixel coordinates back to light coordinates. The depth value is now available in the r texture coordinate.
Figure 9-2 and Figure 9-3 contrast rendering from the normal viewpoint and the light source viewpoint.

During the second rendering pass, the r coordinate is interpolated over the primitive to give the distance from the light for every fragment. Then the texture hardware compares r for the fragment with the value from the texture. Based on this test, a value of 0 or 1 is sent to the texture filter. The application can render shadows as black, or use the shadow ambient extension described in the next section, to use a different luminance value.
The shadow ambient extension allows applications to use reduced luminance instead of the color black for shadows. To achieve this, the extension makes it possible to return a value other than 0.0 by the SGIX_shadow operation in the case when the shadow test passes. With this extension any floating-point value in the range [0.0, 1.0] can be returned. This allows the (untextured) ambient lighting and direct shadowed lighting from a single light source to be computed in a single pass.
To use the extension, call glTexParameter*() with the following parameter specifications:
| pname | GL_SHADOW_AMBIENT_SGIX | |
| param | A floating-point value between 0.0 and 1.0 |
After the parameter is set, each pixel that extension is determined to be in shadow by the shadow extension has a luminance specified by this extension instead of a luminance of 0.0.
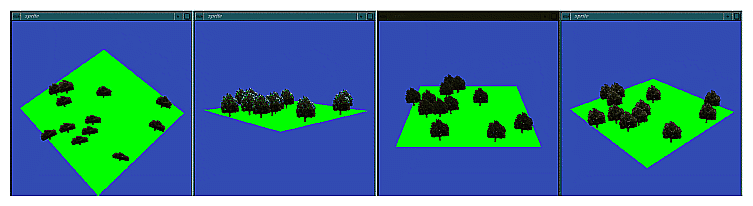
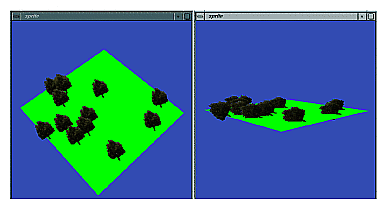
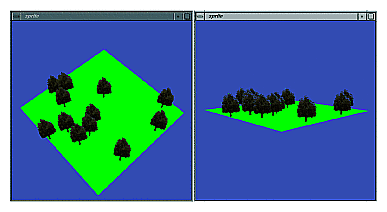
The sprite extension, SGIX_sprite, provides support for viewpoint-dependent alignment of geometry. In particular, geometry that rotates about a point or a specified axis is made to face the eye point at all times. Imagine, for example, an area covered with trees. As the user moves around in that area, it is important that the user always view the front of the tree. Because trees look similar from all sides, it makes sense to have each tree face the viewer (in fact, “look at” the viewer) at all times to create the illusion of a cylindrical object.
Rendering sprite geometry requires applying a transformation to primitives before the current model view transformation is applied. This transformation matrix includes a rotation, which is computed based on the following:
In effect, the model view matrix is perturbed only for the drawing of the next set of objects; it is not permanently perturbed.
This extension improves performance because the flat object you draw is much less complex than a true three-dimensional object would be. Platform-dependent implementations may need to ensure that the validation of the perturbed model view matrix has as small an overhead as possible. This is especially significant on systems with multiple geometry processors. Applications that intend to run on different systems benefit from verifying the actual performance improvement for each case.
Depending on the sprite mode, primitives are transformed by a rotation, as described in the following:
| GL_SPRITE_AXIAL_SGIX | The front of the object is rotated about an axis so that it faces the eye as much as the axis constraint allows. This mode is used for rendering roughly cylindrical objects (such as trees) in a visual simulation. See Figure 9-4 for an example. | |
| GL_SPRITE_OBJECT_ALIGNED_SGIX | The front of the object is rotated about a point to face the eye. The remaining rotational degree of freedom is specified by aligning the top of the object with a specified axis in object coordinates. This mode is used for spherical symmetric objects (such as clouds) and for special effects such as explosions or smoke which must maintain an alignment in object coordinates for realism. See Figure 9-5 for an example. | |
| GL_SPRITE_EYE_ALIGNED_SGIX | The front of the object is rotated about a point to face the eye. The remaining rotational degree of freedom is specified by aligning the top of the object with a specified axis in eye coordinates. This is used for rendering sprites that must maintain an alignment on the screen, such as 3D annotations. See Figure 9-6 for an example. |
The axis of rotation or alignment, GL_SPRITE_AXIS_SGIX, can be in an arbitrary direction to support geocentric coordinate frames in which “up” is not along x, y, or z.
| Note: The sprite extension specification describes in more detail how the sprite transformation is computed. See “Extension Specifications” in Chapter 5 for more information. |
To render sprite geometry, an application applies a transformation to primitives before applying the current modelview matrix. The transformation is based on the current modelview matrix, the sprite rendering mode, and the constraints on sprite motion.
To use the sprite extension, follow these steps:
Enable sprite rendering by calling glEnable() with the argument GL_SPRITE_SGIX.
Call glSpriteParameteriSGIX() with one of the three possible modes:
GL_SPRITE_AXIAL_SGIX
GL_SPRITE_OBJECT_ALIGNED_SGIX
GL_SPRITE_EYE_ALIGNED_SGIX
Specify the axis of rotation and the translation.
Draw the sprite geometry.
Call glDisable() with the argument GL_SPRITE_SGIX and render the rest of the scene.
The following code fragment is from the sprite.c program in the OpenGL course “From the EXTensions to the SOLutions,” which is available through the Developer Toolbox.
Example 9-3. Sprite Example Program
GLvoid
drawScene( GLvoid )
{
    int i,  slices = 8;

    glClear( GL_COLOR_BUFFER_BIT );

    drawObject();

    glEnable(GL_SPRITE_SGIX);
    glSpriteParameteriSGIX(GL_SPRITE_MODE_SGIX, GL_SPRITE_AXIAL_SGIX);

/* axial mode (clipped geometry) */
    glPushMatrix();
    glTranslatef(.15, .0, .0);

    spriteAxis[0] = .2; spriteAxis[1] = .2; spriteAxis[2] = 1.0;
    glSpriteParameterfvSGIX(GL_SPRITE_AXIS_SGIX, spriteAxis);

    spriteTrans[0] = .2; spriteTrans[1] = .0; spriteTrans[2] = .0;
    glSpriteParameterfvSGIX(GL_SPRITE_TRANSLATION_SGIX, spriteTrans);
    drawObject();
    glPopMatrix();

/* axial mode (non-clipped geometry) */
    glPushMatrix();
    glTranslatef(.3, .1, .0);

    spriteAxis[0] = .2; spriteAxis[1] = .2; spriteAxis[2] = 0.5;
    glSpriteParameterfvSGIX(GL_SPRITE_AXIS_SGIX, spriteAxis);

    spriteTrans[0] = .2; spriteTrans[1] = .2; spriteTrans[2] = .0;
    glSpriteParameterfvSGIX(GL_SPRITE_TRANSLATION_SGIX, spriteTrans);

    drawObject();
    glPopMatrix();

/* object mode */
    glSpriteParameteriSGIX(GL_SPRITE_MODE_SGIX, GL_SPRITE_OBJECT_ALIGNED_SGIX);

    glPushMatrix();
    glTranslatef(.0, .12, .0);

    spriteAxis[0] = .8; spriteAxis[1] = .5; spriteAxis[2] = 1.0;
    glSpriteParameterfvSGIX(GL_SPRITE_AXIS_SGIX, spriteAxis);

    spriteTrans[0] = .0; spriteTrans[1] = .3; spriteTrans[2] = .0;
    glSpriteParameterfvSGIX(GL_SPRITE_TRANSLATION_SGIX, spriteTrans);

    drawObject();
    glPopMatrix();


/* eye mode */
    glSpriteParameteriSGIX(GL_SPRITE_MODE_SGIX, GL_SPRITE_EYE_ALIGNED_SGIX);
    glPushMatrix();
    glTranslatef(.15, .25, .0);
    spriteAxis[0] = .0; spriteAxis[1] = 1.0; spriteAxis[2] = 1.0;
    glSpriteParameterfvSGIX(GL_SPRITE_AXIS_SGIX, spriteAxis);

    spriteTrans[0] = .2; spriteTrans[1] = .2; spriteTrans[2] = .0;
    glSpriteParameterfvSGIX(GL_SPRITE_TRANSLATION_SGIX, spriteTrans);

    drawObject();
    glPopMatrix();

    glDisable(GL_SPRITE_SGIX);

    glutSwapBuffers();
    checkError("drawScene");
}
|
The program uses the different sprite modes depending on user input.
Sprite geometry is modeled in a standard frame: +Z is the up vector. -Y is the front vector, which is rotated to point towards the eye.